|
|
Rudder flange damage |
|
|
|
Navigation & Acknowledgements |
3 pictures on this page - scroll down to see the rest
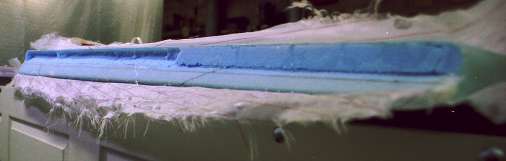
Digging out foam under rudder flange: 2000 06 09.
Canon AV-1, Kodak Royal Gold 200.
Part of the foam under the rudder hinge flange removed.
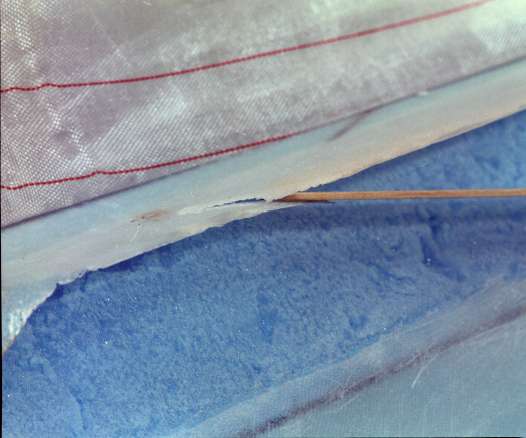
Rudder hinge flange cut: 2000 06 11.
Mamiya RB67, Vericolor 160 Professional.
Things seemed to be going quite well up to this point! I think my knife must have just caught the end of a fibre in the UNI and that drew it into the layup. The cut was quite clean, following the fibre direction of one of the UNI layers.
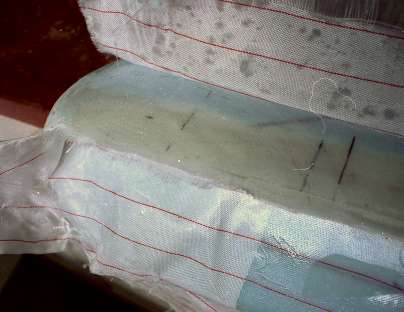
Rudder flange ground back for repair: 2000 06 18.
Canon AV-1, Kodak Royal Gold 200.
It was a bit un-nerving at first seeing Martin Carolan grinding away at the damaged area, but with the light at the right angle, the edge of each layer of UNI appeared like a contour map as he continued. Thus, it was not difficult to see when to stop before cutting into the BID laid up on the inside of the flange. Here, it's all ready for the repair patch to be applied.
|
|
|
go to next picture page |
|
|
||
| Return to Rowland's home page |
| This page last updated 2013-10-16. I try to make this page as accessible as possible, by adhering to HTML 4 standards. |
|
|
| I welcome comments on this website. However, because of the amount of spam it attracts, I no longer post a direct e-mail address on any page. Instead, please click here to contact me. You will have to confirm that you are human before the message will be sent on to me. | ||