|
|
One-cup resin balance |
|
|
|
Navigation & Acknowledgements |
6 pictures on this page - scroll down to see the rest
Resin balance: 2004 01 31.
Canon AV-1, Fuji Superia 100.
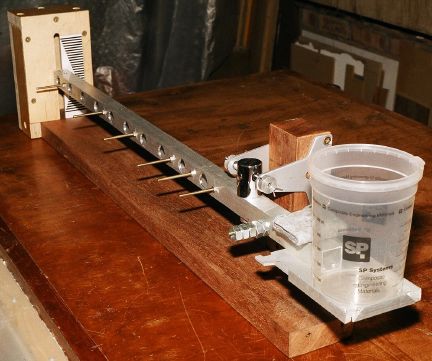
The one-cup resin balance complete and ready for use. An empty mixing cup is on the platform and 5 equal-weight clean, unused, M10 nuts are on the peg to the right of the pivot. The beam is balanced to the neutral point (as shown by an index against the scale at the far left) by sliding the folded-lead weight towards or away from the pivot. Next, one nut is removed from the stack and replaced on one of the pegs to the left of the pivot. (The peg chosen determines the size of the epoxy mix - they are at 1x, 2x, 3x, 5x, 7x & 10x the distance of the right-hand peg from the pivot.) Hardener is added to the cup to bring the beam to the neutral point again. Then, the remaining 4 nuts are removed from the initial peg to the same left-hand one as the first nut. Resin is added to the mixing cup to bring the beam to neutral. Provided that the pivot is sensibly friction-free and that the pegs are orthogonal to the balance beam, the hardener/resin ratio of 1:4 by weight is determined solely by the consistency of weights among the nuts. The inherent problem with 2-cup balances of some unmixed component being left in one or other cup is completely avoided.
Inside of damper box: 2004 01 31.
Canon AV-1, Fuji Superia 100.
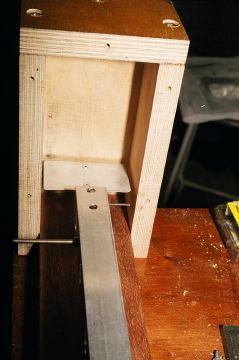
Construction of the air dashpot box for the resin balance, shown without the front plate fitted. The intent of including this was to damp the swings of the beam more quickly. The damper vane had to be trimmed to a size that would allow it free travel within the box. This was not as simple as first might be imagined, because the pivot is significantly above the beam on which the vane is mounted. Thus the arc through which the vane travels is asymmetrical about the neutral point. Because the inner faces of the dashpot box are vertical planes, the resultant leakage reduces the effectiveness of the damping action. However, making the relevant faces of the dashpot box as large-radius cylindrical arcs rather than planes seemed too much like hard work!

Scale and index pin: 2004 01 31.
Canon AV-1, Fuji Superia 100.
Here's the front of the dashpot box fitted, with the printed scale stuck to it. The index pin is an 8BA x 20mm machine screw. Both the black bars of the scale and the white spaces between them were drawn in CADintosh as 2.2mm wide - that is, approximately the crest diameter of the 8BA thread.
Mirror mount and alternative cup: 2004 01 31.
Canon AV-1, Fuji Superia 100.
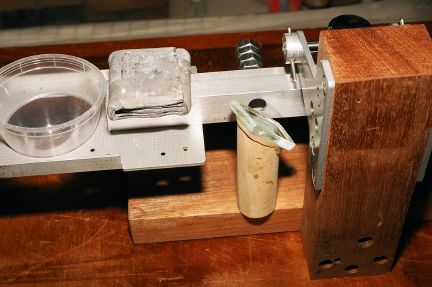
This shows the way the mirror is mounted on the base, behind the balance beam, to provide a good view of the scale and index pin without having to take one's eyes too far from the business of dispensing the epxoy components into the mixing cup. Also visible is the alternative location method for a smaller mixing cup, which may be more suitable for smaller batches. I use polypropylene bowls which come with mini sponge puddings inside - but clean them out well before this change of use, of course! Their shape makes cured epoxy easy to pop out for re-use of the cup.
Scale viewed in mirror: 2004 01 31.
Canon AV-1, Fuji Superia 100.
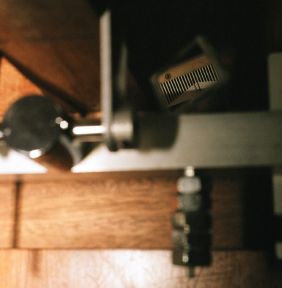
The operator's view of the scale in the mirror. The small size of the mirror, its mounting at beam-centre height, and its distance of over 600mm from the scale all minimise parallax errors. Apologies for the rather poor lighting, I was trying to light both the distant scale and the nearby beam parts with a single flashgun. The harsh shadow cast by the index pin is almost as prominent on the scale as the pin itself, which is actually dead on the neutral point of the scale. I know I should really have set up a brolly-flash, but life is too short!
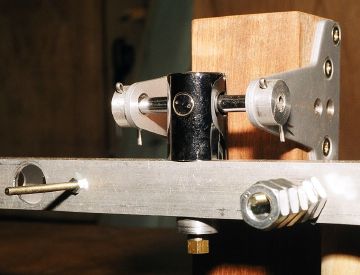
Pivot details: 2004 01 31.
Canon AV-1, Fuji Superia 100.
The pivot, which started out in life about 30 years ago as a record-player pickup arm. I picked the whole Lenco GL85 deck out of a skip thinking it might be salvageable, but it was past saving as a going concern. (Made me a bit sad to think that back in the 1960s when I had a Garrard SP25 Mk III, I'd have been very ready to swap it for such a bit of kit.) Although the loads here are in the opposite direction, and greater than in the original application, the bearing shows no sign of distress and operates very freely. Before I added the dashpot, it would oscillate for minutes before stopping. The supporting brackets were parts left over from the installation of door closers. The M10 nuts which act as weights are on the initial peg to the right of the pivot, for balancing with the cup empty. The first of the left-hand pegs is also visible.
|
|
|
go to next picture page |
|
|
||
| Return to Rowland's home page |
| This page last updated 2013-10-16. I try to make this page as accessible as possible, by adhering to HTML 4 standards. |
|
|
| I welcome comments on this website. However, because of the amount of spam it attracts, I no longer post a direct e-mail address on any page. Instead, please click here to contact me. You will have to confirm that you are human before the message will be sent on to me. | ||